Main interface overview#
NeuroMiner is software that has a text-based interface and works from the MATLAB command line. This implies that all analyses are implemented by selecting options from text menus and entering parameters when asked to do so. Each of the menus share a similar format as described in the following example.
After the neuroimaging paths have been established, you can start NeuroMiner by typing ‘nm’ (or ‘nm expert for expert mode). The initial MAIN INTERFACE, when no data has been entered yet looks like this:
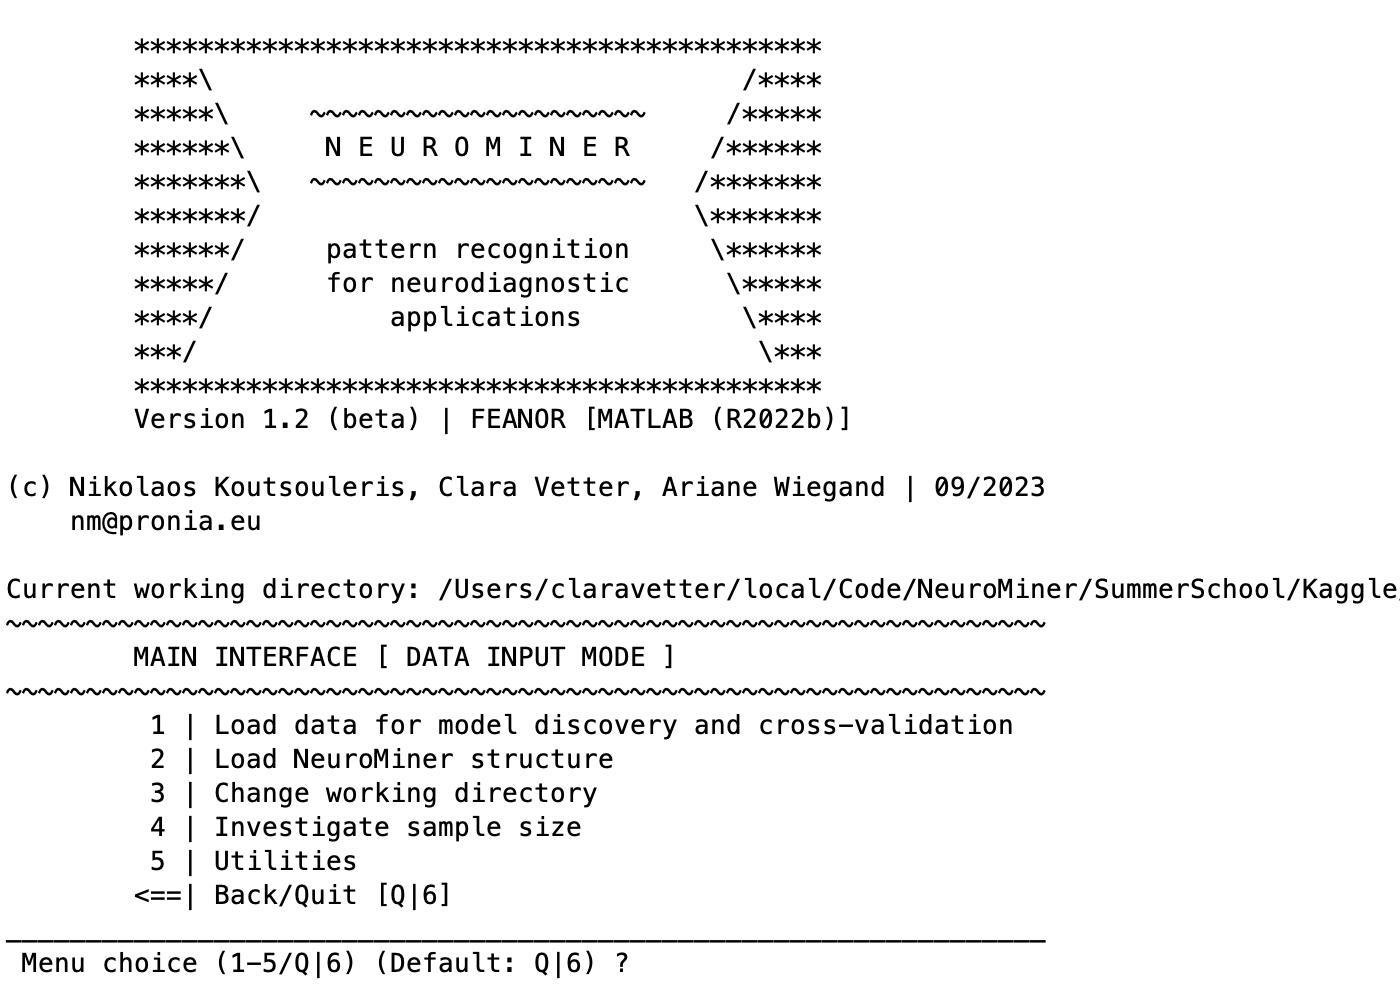
It consists of 4 options that are numbered 1-4 as well as the option to go Back/Quit (Q). To select an option, simply enter the number associated with it. The number you’ve entered will appear next to “Menu choice (1-4/Q) (Default: Q)?”, if you made a mistake, you can simply delete it and type again. If you’ve entered the correct number, press “Enter”.
The user can now do one of two things:
Select one of the 5 numerals corresponding to each option and press the enter key on the keyboard;
Type ”Q” or “6” or Enter to go back to the previous menu, or if they are in the MAIN INTERFACE this will quit the program.
For example, a user could press 2 if they wanted to load a NeuroMiner structure. The NeuroMiner MATLAB structure (”NM”) is the primary variable that NeuroMiner uses to store data, settings, analyses, and results. For example, when a user inputs data into NeuroMiner it is stored in the NM structure as a data matrix. Then when the user chooses settings or performs an analysis, all of these inputs and outputs are stored in the structure as well. This means that the NM structure forms the core of any analysis within NeuroMiner.
Alternatively, to set up a new NM structure, starting with the data input, press 1 to select Load data for model discovery and cross-validation. We will cover that in a later chapter in more detail.
Tip
It is important to note that the NeuroMiner structure is not automatically saved during analyses in order to give the user more control. This means that the user must save the structure periodically during the analysis using the menu item Save NeuroMiner structure.
NeuroMiner will automatically change the items in all menus based on two main criteria:
Whether a NeuroMiner MATLAB structure storing all the information from a previous analysis has been loaded to the MATLAB workspace;
The individual options that are selected during a NeuroMiner session.
For example, if a NM structure is loaded prior to the start of a NeuroMiner session then the program will automatically detect this and the MAIN INTERFACE will specifically relate to the loaded structure. Similarly, if specific options are chosen during the establishment of the analysis, the menus will adapt to the chosen settings and options that do not apply to the analysis will be removed.
The main interface after data has been loaded and processed#
Once the user has entered and processed data, the MAIN INTERFACE will change to the following:
These options are major functional domains related to the methods and stages of machine learning analysis using NeuroMiner. The contents of each of these options are described throughout the manual, but it is important to understand the overall analytic workflow that the program uses (see Fig. 3) by briefly describing each of the options above.
The NeuroMiner workflow#
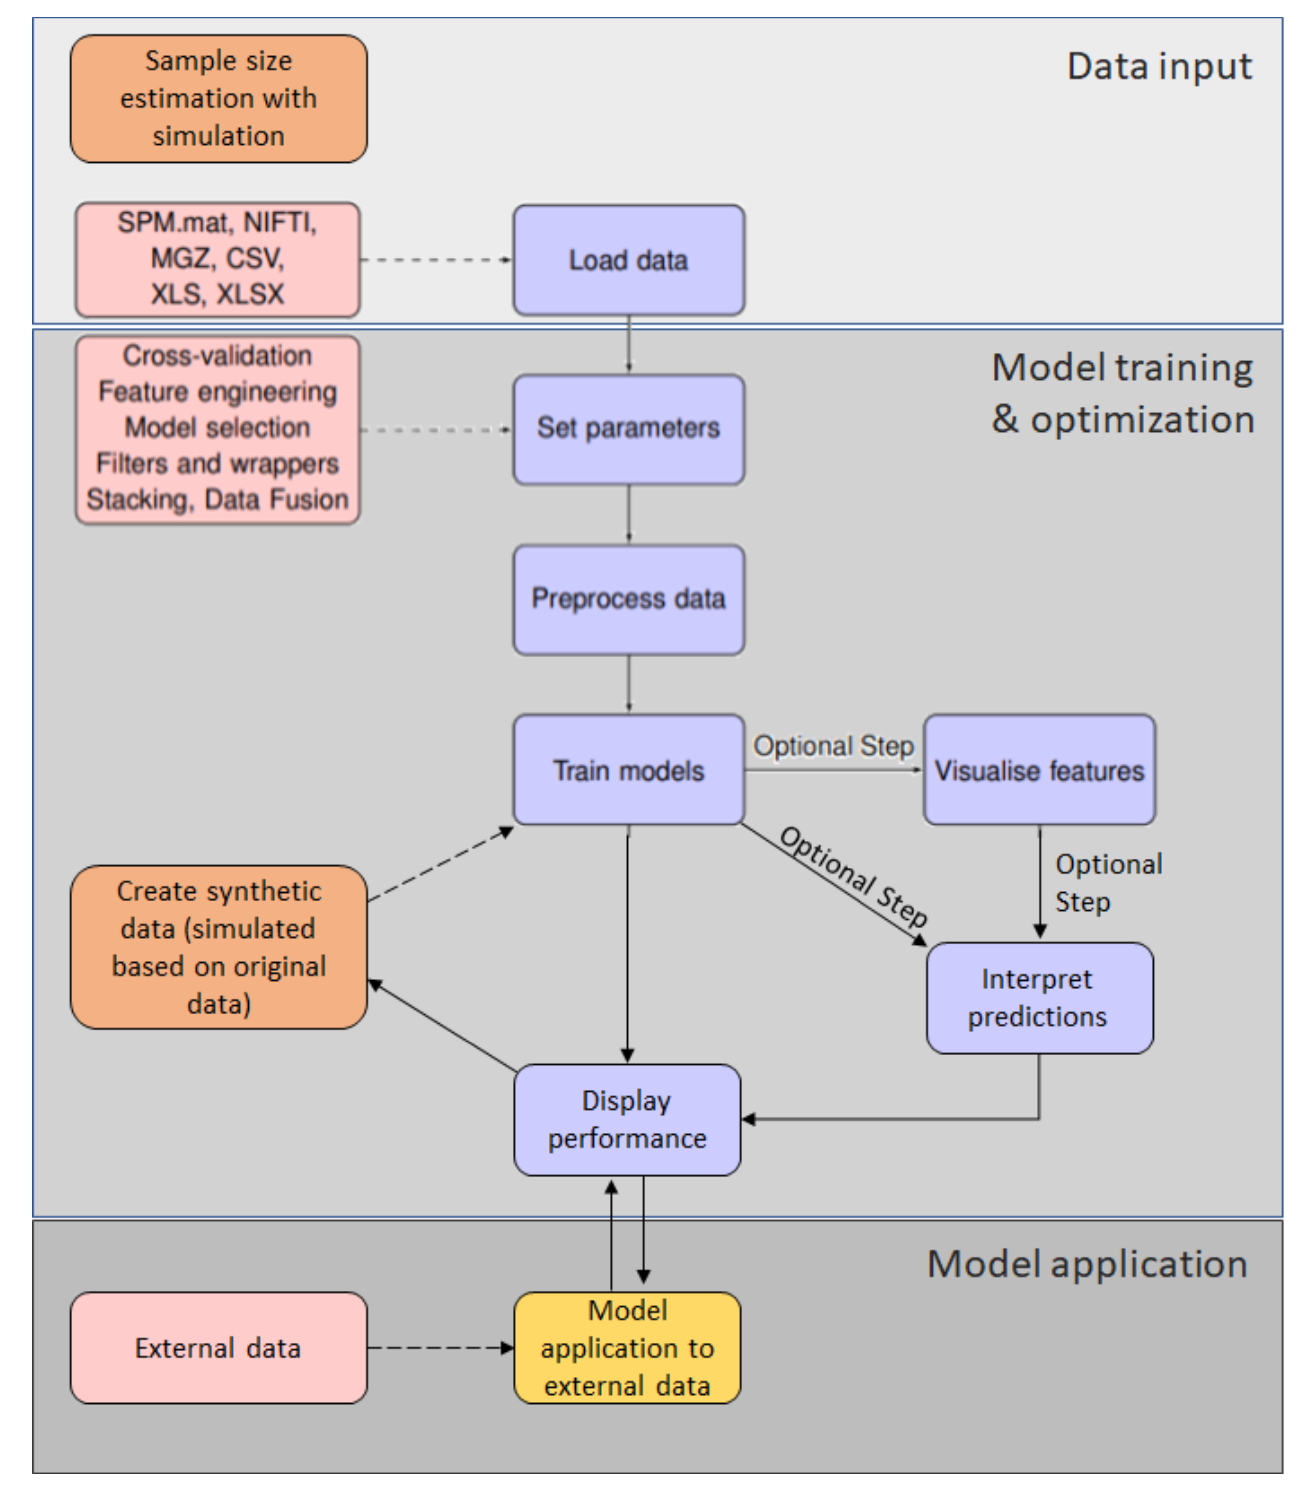
Fig. 3 A flow chart for NeuroMiner. The main processing steps involve entering data and then defining a parameter template with the settings that are required for an analysis. It is recommended that the data are preprocessed (i.e., that feature engineering takes place) before the models can be trained. After training, the user has the option to ’visualize’ the classifiers, where the model and other statistics on each individual feature are calculated. The user can display the performance of the models in a results screen.#
1. Input data into NM#
The entry of data is the most important aspect of any analysis. When data is entered into NeuroMiner, it is stored within a MATLAB structure called ”NM” (i.e., ”NeuroMiner”) in the workspace. All other analyses and results are then added to this NM structure as the user progresses. The contents of the structure can also be viewed from the MATLAB command line.
See data entry for more details.
2. Define parameter template#
Once the data have been entered, the first step of any analysis is to define the machine learning options. Within this menu, the user can establish the cross-validation framework (e.g., nested cross-validation), perform essential preprocessing operations on the data (e.g., scaling), choose the machine learning algorithm (e.g., SVM), define the machine learning algorithm settings (e.g., C values), and perform other operations on the data.
See define parameters for more details.
3. Initialize/Delete analyses#
After the entry of all the settings for an analysis, the user can ’initialize’ these settings in preparation for processing. This option saves the parameters in an analysis structure, which the user can then select when going to process the data. This is a great feature because it allows the user to define multiple different analyses for the same dataset by changing parameters in the ’parameter template’ and initializing separate analyses.
4. Preprocess Features#
In NeuroMiner, the analysis can be split into two parts: preprocessing features and training supervised classifiers. Preprocessing in NeuroMiner can also be called ’feature preparation and selection’, and involves preparing the data for machine learning analysis (e.g., a support vector machine). For example, the researcher may want to covary for age and sex, perform a Principal Components Analysis (PCA), and scale neuroimaging data prior to analysis. NeuroMiner performs all preprocessing steps within the cross-validation structure, which is recognized as the most valid approach. Allowing the user to preprocess their data first within the cross-validation structure can save a lot of computational resources and time because it means that the researcher can run multiple analyses from the same preprocessed data.
5. Train supervised classifiers#
This option allows the user to select and run the machine learning analysis. For example, the user can run a support vector machine across a range of C parameters. The results of this analysis are then stored in the NM structure.
6. Visualize classifiers#
This step is optional. In a standard machine learning analysis, it is often unclear how each of the features (e.g., imaging voxels or variables) contribute to the prediction accuracy and they are often not in the same space as the original images. For this reason, the user has the option within NeuroMiner to calculate statistics for each feature with the ’visualize classifiers’ option. When using neuroimaging data, this option also projects (i.e., transforms) the data into the original space so that it can be viewed in a similar manner as other neuroimaging results in NIfTI files.
7. Interpret predictions of classifiers in discovery data#
This step is also optional. Most machine learning algorithms operate as a black box and their predictions are missing interpretability and transparency. To obtain an estimate to what extent each feature contributed to an individual prediction, different methods are available.
8. Open NM Results Viewer (cross-validation results)#
Based on the above essential steps, and the optional step to visualize the classifiers, the results of the analysis will be ready to be viewed with this step. For example, the user can view the accuracy, the frequency of model selection, the classifier weights that are applied to each variable, and any additional visualization routines that have been run.
9. Lock analyses and start NM application mode#
This option will lock the NeuroMiner structure so that no additional analyses can be run. This means that NeuroMiner will switch to model application mode and the model can be applied to external data.
10 - 11. Load and save NeuroMiner structure#
These options allow the user to load an NM structure (where all the settings and analyses are stored) to the MATLAB workspace or to save the current NM structure as a .mat file.
12. Change working directory#
Like most neuroimaging software, NeuroMiner operates from a ”working directory” where preprocessing or analysis files are saved during any analysis. The working directory is automatically the directory where NeuroMiner is started, but can be changed using this item.
13. Estimate sample size#
Starting in NM1.1, two simulation tools are available that (1) measure algorithmic prediction performance across different parameters critical to machine learning algorithms, such as sample size, feature dimensionality, event rate, ratio and predictive power of features associated with a given label, or (2) use an existing NM data structure and analysis design to simulate the effects of varying sample size on prediction performance. The former tool is a “pre”-data entry method that can be used to generate and learn from purely synthetic data following specific user-defined settings. In NM1.1 it produces only binary classification and, thus, cannot be used to simulate regression frameworks. The second, “post”-data entry tool works with already set-up NM structures that contain initialized analyses. Here, the purpose is to evaluate the performance of the given analysis pipeline as a function of sample size. Both tools are still under development and can be considered alpha. Your feedback is welcome.
See estimate sample size for more details.
14. Utilities#
Contains functions related to FreeSurfer and ability to add SPM/FreeSurfer paths to the NeuroMiner environment. Moreover, it gives different options to generate master files. As mentioned above, NeuroMiner stores settings and analysis results in the NM structure within MATLAB, which is visible in the workspace. In addition to this, NeuroMiner can also store individual files related to steps (e.g., preprocessing, training, visualization). When NeuroMiner does this, it stores a single file for each permutation within the cross-validation framework – as described later. These individual files can then be saved as ”master files” using this option.