Out of Sample Cross-Validation#
External, out-of-sample cross-validation (OOCV) is a cornerstone of machine learning and is required for strong generalizability claims. This usually involves the application of the trained models used to predict targets in the CV2 data folds to a separate dataset that has been independently collected.
External validation relies on the trained models being completely separate from the OOCV data. For this reason, after completing the analysis the user must first lock analyses and start the NM application mode using the following procedure. As mentioned in the section on cross-validation, a form of external validation can be done within a machine learning analysis by selecting the leave-group-out option if the group comes from an external source (i.e., it is not from the same study or sample). However, mostly external validation is done when models from one analysis are applied to a completely different site and study. It is important to note that within a machine learning framework external validation never means that new models are created within a different sample and then the results are compared (e.g., comparison of the beta coefficients or the p-value for significance). This is usually referred to as replication and is basically never the point of machine learning because it is a field that grew around translation and practical application of models. The aim of machine learning is to create models that can be applied without modification to external samples to facilitate predictions at another site. The ultimate aim is to be able to integrate models into clinical care globally.
For this critical function, the best performing models, that were applied to the test sets at the outer CV2 level, need to be applied to another, unseen (external) sample. Keep in-mind that when we refer to models in NeuroMiner then we are referring to the entire pipeline of operations that are applied to the data: from preprocessing to training. In NeuroMiner, as described in the section on cross-validation, the optimal models are ultimately retrained in each of the CV1 folds before being applied to the outer test folds. Thus, these are also the models which will be applied to the external validation data. For example, if there are 5 folds on the outer cycle and 5 folds on the inner cycle then 5 x 5 = 25 model pipelines will be applied to the external validation data (assuming that the single best model is chosen for each training fold).
As stated in the section on cross-validation, in order to get a valid measure of generalizability it is critical that all operations included in the model training process are applied without modification to the external validation.
Important
It is critical that different model sets aren’t repeatedly applied to the external validation data so that the user can choose what parameters and options fit the external data best. This would completely undermine the reason for performing external validation. Luckily, in NeuroMiner features have been developed so that the user can’t easily re-run analyses with the external validation.
Note
NeuroMiner has two modes, discovery mode and application mode.
Discovery mode refers to the model training phase discussed in the previous sections.
Application mode refers to the model application to external validation samples.
This distinction ensures that the discovered models are not retrained on the validation sets.
To enter application mode and apply your model to an external sample, the first step is locking your analyses. In order to do that, you must make sure all of your analyses have been computed. If there are analyses you don’t want to compute, please remove them before continuing.
Important
This option will only show if all initialized analyses have been completed. Please make sure to train or otherwise delete any untrained analysis before entering application mode.
Once all analyses initialized in NM are completed (i.e. trained), the MAIN INTERFACE will include the additional option (“8”):
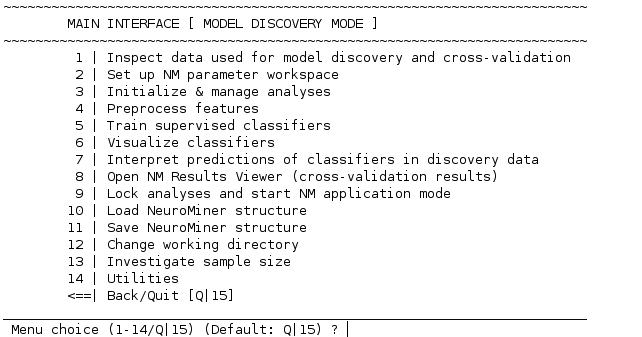
When selecting 8 | Lock analyses and start NM application mode, you will be prompted with the question
Do you want to finish the model discovery phase?
[y]es / [n]o (Default: no)?
To continue to application mode, type ‘y’ or ‘yes’ and press enter. A new menu will open.
NeuroMiner’s application mode#
The initial menu of NeuroMiner’s application mode looks like this:
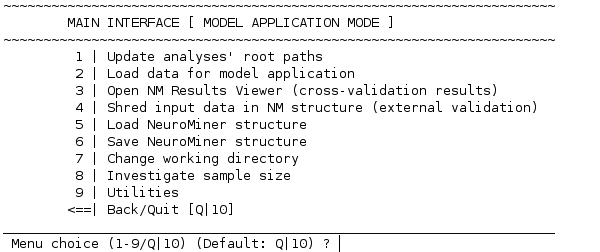
Fig. 29 NeuroMiner’s main menu in application mode#
Tip
If the analyses of the NM model are trained from another location, please update the root path of all analyses to the current file path where the NM structure is saved at. To do that, please select 1 | Update analyses’ root paths and follow the instructions.
2 | Load data for model application#
When you choose this option, the following dialogue box will appear:
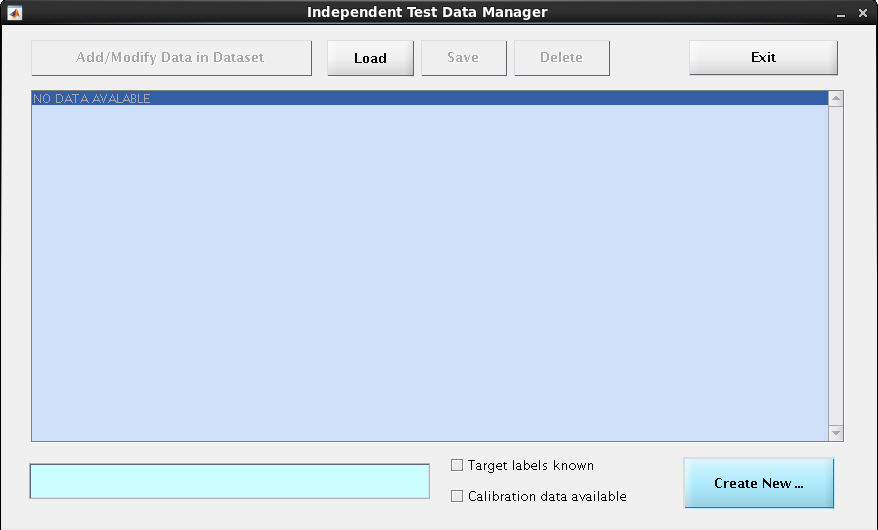
To enter new data,
1. Indicate whether the target labels are known#
In the case of classification, are the groups the cases belong to known? If the labels are known, select the tick-box at the bottom right called “Target labels known”, otherwise leave it unchecked.
2. Create a new data container#
Click the Create New button at the bottom right. This will add a new entry to the middle blue center box (replacing the ‘NO DATA AVAILABLE’ line). This new entry should be similar to this:
[ 1] (0 cases); data; 02-Sep-2022 08:39:04; labels known; yes
Repeating these 2 steps, you can create as many new data containers as you want.
3. Fill these empty data containers#
To do so, select the container from the list in the blue center box (click on it) and then choose the button Add/Modify Data in Dataset in the upper left corner. You will be redirected to:

4. Enter the data#
Select 1 | Add/Modify OOCV data. You might recognize the now appearing menu since it contains some of the options you encountered during the initial data entry:
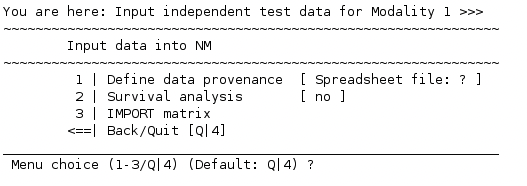
A point to note is that the type of input data has to be the same as that of the discovery data type used. NeuroMiner automatically detects the previous input data type (data provenance) and asks accordingly (in the case shown above, from a spreadsheet file). Specify the data you want to use as the validation set and IMPORT it.
Important
Don’t move any of the discovery data files from the location on your computer once you have specified their directories to NeuroMiner (including any masks used in the processing). Otherwise, NeuroMiner will fail at this step.
5. Covariates and additional modalities#
After you imported the data modality, you are redirected to the menu shown in step 3. If you entered covariates or more modalities during the discovery phase, NeuroMiner will at this point ask for a covariates variable and additional modalities of the validation sample. Remember that covariates always need to be loaded into the matlab workspace (see data entry for the discovery sample).
Important
If you entered several modalities during the discovery phase, you have to add the same modalities for the validation sample in the same order.
Important
The covariates table of the validation sample needs to contain the same covariates in the same order as for the discovery data. NeuroMiner will assume that this is the case and will not ask you to define the covariate names anymore.
Once you are finished with data entry, return to the main menu of the application mode (Fig. 29).
6. Add subgroup information to OOCV data#
This option allows you to read sugroup information about the OOCV data. By doing so you will be able to see the performance of your trained model when applied to these subgroups individually. Further, you can also specify whether one of your groups should act as a reference group. In this case performance of the model on each subgroup is compared to the performance of the model on the reference group.
Important
The variable has to be in the form of a logical, dummy-coded matrix and should be present in your Matlab workspace, then you can simply enter the name of the variable.
It has to be data-type logical, simply defining a matrix with ‘O’ and ‘1’ but double type will lead to an error.
3 | Set up parameters for model application#
This option opens the following sub menu:
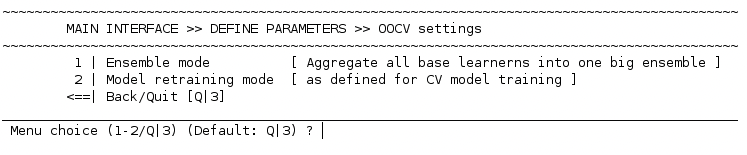
1 | Ensemble mode#
This relates to how the models are applied to the external validation sample and is relevant to all machine learning analyses. In NeuroMiner, you can choose from two possible ensemble construction modes
1 | Aggregate ALL base learners into ONE ensemble
2 | Compute mean decisions of CV1 partion ensembles before aggregating
Aggregate ALL base learners into ONE ensembe mode#
When you use a cross-validation design to train your models, all models relate to one of the outer, CV2, folds. In contrast, in the case of external validation, all the models will be applied to this one sample. This means that the procedure applied to the external validation sample is different from what is applied to the discovery sample.
Compute mean decisions of CV1 partition ensembles before aggregating#
For this reason, NeuroMiner provides the option to apply each CV1 partition ensemble for each CV2 fold before computing a mean of these decisions in order to follow a more similar logic to the discovery sample procedure.
2 | Model retraining mode#
The next important option is the 2 | Model retraining mode option. Here, you have the choice between
1 | As defined for CV training phase
2 | Use all available CV data (CV1+CV2)
This is a critical aspect of NeuroMiner that needs to be understood from a machine learning perspective.
As a default, NeuroMiner does not save the specific model parameters to disk because they generally consume a large amount of disk space (e.g., 50G). Instead, NeuroMiner defines the optimal parameters for the models during the preprocessing and training procedures. It then retrains the models in the discovery sample using these parameters before applying them to the external validation sample.
For this option, NeuroMiner gives the possibility to retrain the models in the same way that they were trained on the discovery sample or to ‘Use all available CV data (CV1+CV2)’.
The first option; 1 | As defined for CV training phase is recommended if the point of the analysis is to validate the original models that will be displayed in a paper.
Note
The gold standard though would be to save the models and use the exact models calculated in the discovery cohort for the external validation cohort, which can be done during Visualization in NeuroMiner. The reason for this is that there can be minor changes to the models when they use non-deterministic procedures (e.g., gradient descent).
After setting up the parameters, you can return to the main menu of the application mode (Fig. 29). Now the menu options include 4 | Apply classifiers to independent data.
4 | Apply classifiers to independent data#
The submenu that opens when you select this option looks very similar to the train models. Choose the independent data container you want to work on and select “7 | PROCEED” once all options are set accordingly.
Using the winning parameters from your discovery analyses, the models will now be retrained in the discovery data before being applied to the external validation data. You can see this happening in the matlab command window.
Important
In order to apply stacker models to independent data, you must first make sure that the same independent data has already been applied to all the base learner models of the stacker model. Otherwise, the stacker model cannot be applied to the independent data.
5 | Open NM Results Viewer#
This option takes you to the Results Viewer as in the discovery mode. If you click on the second drop-down box then there will be an option to select the external validation data for the selected analysis that you entered.
6 | Shred input data in NM structure (external validation)#
This function replaces the modalities in the NM structure with random data and thus allows NM structures to be safely sent to external collaborators from a data privacy perspective. Make sure that you have written out optimized preprocessing and model data during model visualization, otherwise the models will not be applicable to external samples after data shredding.